Air Precision Elt 96 — Maintenance Manual Verified [extra Quality]
The "XMIT ALERT" light should flash briefly and then go out.
: The manual provides a comprehensive record of revisions (e.g., Revision 6, July 2010), including updates to tool lists and approved repair station addresses. Inspections
Ensuring the internal accelerometer triggers the signal at the correct impact force. Recertification:
: Flip the ELT main switch from "ARMED" to "ON".
The ELT 96 was originally manufactured by (later Cobham/Everaxis). Maintenance must be performed by qualified personnel to ensure the programmed identification signal (Country ID, registration) remains valid and the G-switch is correctly calibrated. ELT 96/97 Emergency Locator Transmitters | PDF - Scribd
The Air Precision ELT 96 may be a small component in a massive airframe, but its maintenance is a high-stakes task. Adhering to a verified maintenance manual is not merely a bureaucratic requirement; it is a commitment to the lives of the crew and passengers. In an emergency, the quality of the maintenance performed months or years prior becomes the deciding factor in a successful rescue mission. regulatory requirements for ELT testing?
The manual outlines a strict and specific calendar of recurring tasks:
: Must be performed every 12 calendar months to check for proper installation and battery corrosion.
The following steps were performed to confirm manual authenticity and validity:
Unlike modern units with downloadable PDFs, locating the official Air Precision ELT 96 manual can be challenging due to the business transfer from Socata. Start by checking the aircraft's own airframe logbooks. If the ELT was factory-installed, the original weight and balance or equipment list often cites the manual part number. Contact the airframe manufacturer (Socata/Daher). They may have copies of the original technical documentation in their archives.
: The first place to check would be the official Air Precision website or the website of its parent company if it has been acquired. Companies often host manuals, datasheets, and other technical documents for their products.
After battery replacement, a full self-test must be performed to ensure the new pack is functioning. 3. Technical Specifications and Performance
Regulatory frameworks typically mandate a thorough inspection every 12 calendar months. This includes:
The unit has been inadvertently activated for more than one cumulative hour during testing. Steps for Battery Servicing
[Name], Licensed Aircraft Maintenance Engineer (License #) [Your Org Name] Date of verification: [Date]
How to Install Windows® 10 To A GUID Partition Table (GPT)
Properly Install Windows® 10 on Your Storage Disk With UEFI Enabled In The System BIOS And The GPT (GUID Partition Table) Created
Summary
We recommend performing Windows® 10 installations enabling UEFI with a GUID Partition Table (GPT).
Some features may not be available if you use the Master Boot Record (MBR) style partition table.
Configure a system to install an OS to a GUID Partition Table (GPT) partition
| Note |
- We highly recommended performing a backup of your data. If you have a second disk drive with enough available capacity, you can create a system image and recover the full installation as it was before you started this procedure.
- Screenshots and directions below are examples. Consult with your motherboard or system manufacturer for specific BIOS instructions.
|
- Connect a USB Windows® 10 UEFI install key
- Boot the system into the BIOS (for example, using "F2" or the "Delete" key)
- Locate the "Boot Options Menu"
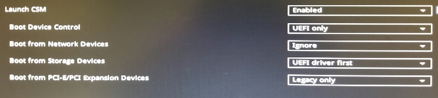
- Set Launch CSM to "Enabled." If CSM is set to "Disabled," you can skip to step 8 below
- Set Boot Device Control to "UEFI Only"
- Set Boot from Storage Devices to UEFI driver first
- Save your changes and restart the system.
- Reenter the BIOS (for example, using "F2" or the "Delete" key).
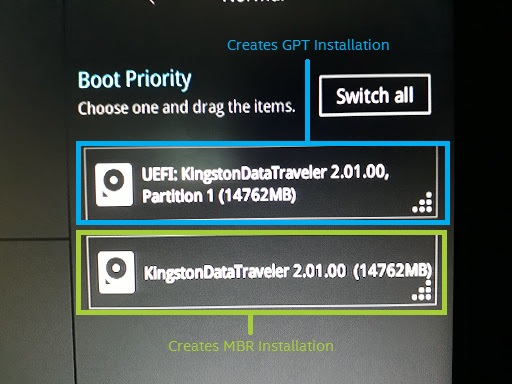
- Confirm in the Boot Priority List that the "USB UEFI OS Boot" option is at the top of the list.
- Reboot the system and install Windows* as usual.
Confirm that Windows* is installed to a GPT partition. air precision elt 96 maintenance manual verified
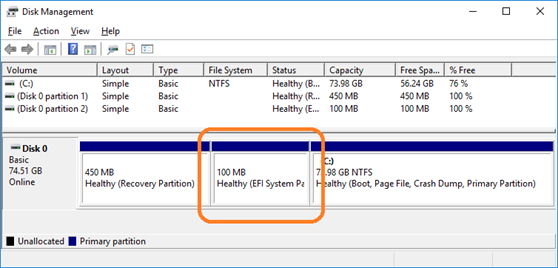
- Boot into Windows*
- Open Disk Manager (For Windows® 10, press the "Windows*" key and the "X" key simultaneously, then click "Disk Manager"). You see three partitions including the EFI System Partition.
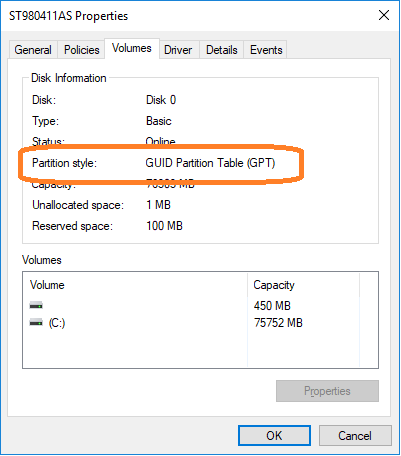
3. Right-click the disk shown as (Disk x, Basic, Capacity, Online) on the left
4. Select "Properties"
5. Click the "Volumes" tab. Here you can confirm the "Partition style".
Questions? Check out our Community Forum for help. The "XMIT ALERT" light should flash briefly and then go out
Issues? Contact Solidigm™ Customer Support:
[Chinese] [English] [German] [Japanese] [Korean]
The "XMIT ALERT" light should flash briefly and then go out.
: The manual provides a comprehensive record of revisions (e.g., Revision 6, July 2010), including updates to tool lists and approved repair station addresses. Inspections
Ensuring the internal accelerometer triggers the signal at the correct impact force. Recertification:
: Flip the ELT main switch from "ARMED" to "ON".
The ELT 96 was originally manufactured by (later Cobham/Everaxis). Maintenance must be performed by qualified personnel to ensure the programmed identification signal (Country ID, registration) remains valid and the G-switch is correctly calibrated. ELT 96/97 Emergency Locator Transmitters | PDF - Scribd
The Air Precision ELT 96 may be a small component in a massive airframe, but its maintenance is a high-stakes task. Adhering to a verified maintenance manual is not merely a bureaucratic requirement; it is a commitment to the lives of the crew and passengers. In an emergency, the quality of the maintenance performed months or years prior becomes the deciding factor in a successful rescue mission. regulatory requirements for ELT testing?
The manual outlines a strict and specific calendar of recurring tasks:
: Must be performed every 12 calendar months to check for proper installation and battery corrosion.
The following steps were performed to confirm manual authenticity and validity:
Unlike modern units with downloadable PDFs, locating the official Air Precision ELT 96 manual can be challenging due to the business transfer from Socata. Start by checking the aircraft's own airframe logbooks. If the ELT was factory-installed, the original weight and balance or equipment list often cites the manual part number. Contact the airframe manufacturer (Socata/Daher). They may have copies of the original technical documentation in their archives.
: The first place to check would be the official Air Precision website or the website of its parent company if it has been acquired. Companies often host manuals, datasheets, and other technical documents for their products.
After battery replacement, a full self-test must be performed to ensure the new pack is functioning. 3. Technical Specifications and Performance
Regulatory frameworks typically mandate a thorough inspection every 12 calendar months. This includes:
The unit has been inadvertently activated for more than one cumulative hour during testing. Steps for Battery Servicing
[Name], Licensed Aircraft Maintenance Engineer (License #) [Your Org Name] Date of verification: [Date]